As a supplier of checking fixtures, I understand how crucial it is to ensure the traceability of checking fixture calibrations. Traceability not only guarantees the accuracy and reliability of the fixtures but also helps in meeting regulatory requirements and maintaining high - quality standards. In this blog, I'll share some of the ways I ensure traceability in our checking fixture calibration process.


The Importance of Traceability in Checking Fixture Calibrations
Before diving into the methods, let's talk about why traceability matters. In the manufacturing industry, checking fixtures are used to verify the dimensions and quality of parts. If these fixtures are not calibrated correctly, it can lead to defective products, production delays, and even safety hazards. Traceability allows us to track the calibration history of each fixture, which helps in identifying any issues that may arise during the manufacturing process. It also provides evidence of compliance with industry standards and customer requirements.
Documenting Every Step
One of the most fundamental ways to ensure traceability is through detailed documentation. Every time a checking fixture goes through calibration, we record a wealth of information. This includes the date of calibration, the name of the technician who performed the calibration, the calibration equipment used, the results of the calibration, and any adjustments made to the fixture.
We use a digital database to store all this information. It's super convenient as it allows us to easily search and retrieve data whenever needed. For example, if a customer asks for the calibration history of a particular fixture, we can quickly pull up the relevant records. This digital record - keeping also reduces the chances of human error that can occur with paper - based systems.
Calibration Equipment Traceability
The equipment we use for calibrating checking fixtures also needs to have its own traceability. We make sure that all our calibration equipment is calibrated regularly by accredited laboratories. Each piece of equipment has a unique identification number, and we keep a record of its calibration history. This way, we can prove that the calibration of our checking fixtures is based on reliable and traceable measurement standards.
For instance, if we use a coordinate measuring machine (CMM) for calibration, we know exactly when it was last calibrated, what the calibration results were, and who performed the calibration. This chain of traceability ensures that the measurements we take during the checking fixture calibration are accurate and trustworthy.
Unique Identification of Checking Fixtures
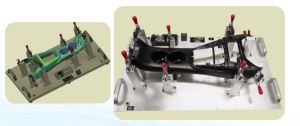
Each checking fixture we supply has a unique identification number. This number is engraved or labeled on the fixture itself, and it's also associated with all the calibration records in our database. This unique identifier makes it easy to track the fixture throughout its lifecycle.
Whether the fixture is in our workshop, at a customer's site, or being sent for maintenance, we can always refer to its ID to access its calibration history. It also helps in preventing mix - ups between different fixtures, which could lead to incorrect calibration data being associated with the wrong fixture.
Regular Audits and Reviews
We conduct regular internal audits of our calibration processes. These audits are designed to check if we are following our documented procedures correctly and if all the calibration records are complete and accurate. During these audits, we review the calibration history of a sample of checking fixtures to ensure that there are no gaps in the traceability chain.
We also participate in external audits from time to time. These can be from customers or industry regulatory bodies. These external audits give us an objective view of our calibration traceability processes and help us identify areas for improvement.
Training and Competence of Technicians
The technicians who perform the calibration of checking fixtures play a vital role in ensuring traceability. We provide them with comprehensive training on calibration procedures, the use of calibration equipment, and the importance of accurate record - keeping.
Our technicians are required to keep up - to - date with the latest industry standards and best practices for calibration. We encourage them to attend relevant training courses and workshops. By having well - trained technicians, we can be confident that the calibration processes are carried out correctly, and the traceability of the checking fixtures is maintained.
Software for Traceability Management
We use specialized software to manage the traceability of our checking fixture calibrations. This software helps us automate many of the processes, such as generating calibration reports, sending reminders for upcoming calibrations, and maintaining the digital database of calibration records.
The software also allows us to generate various types of reports, such as summary reports of calibration results for a particular period or detailed reports for a specific fixture. These reports are very useful for internal management as well as for providing information to customers.
Working with Accredited Calibration Laboratories
In some cases, we send our checking fixtures to accredited calibration laboratories for calibration. These laboratories have the expertise and equipment to perform high - precision calibrations. When we work with these laboratories, we ensure that they provide us with detailed calibration certificates.
These certificates include all the necessary information about the calibration, such as the measurement standards used, the uncertainty of the measurements, and the calibration results. We then add this information to our own database to maintain the traceability of the fixture.
Communication with Customers
We believe in keeping our customers informed about the traceability of the checking fixtures we supply. When a customer purchases a checking fixture from us, we provide them with access to the calibration history of the fixture through our online portal. This transparency builds trust with our customers and shows them that we are committed to providing high - quality products.
We also offer support to our customers regarding calibration traceability. If they have any questions or need assistance in maintaining the traceability of the fixtures at their end, our team is always ready to help.
Conclusion
Ensuring the traceability of checking fixture calibrations is a multi - faceted process that involves documentation, equipment management, technician training, and communication. By implementing these practices, we can provide our customers with checking fixtures that are not only accurate but also have a complete and reliable calibration history.
If you're in the market for high - quality checking fixtures with excellent calibration traceability, we'd love to hear from you. Whether you're in the automotive industry or need Checking Fixture For Automotive Industry, or looking for Checking And CMM Fixtures, we can offer you the right solutions. Check out Sunyuu Gauges And Checking Fixtures to learn more about our products. Reach out to us for a quote or to discuss your specific requirements. We're here to help you with all your checking fixture needs.
References
- ISO 10012:2003, Measurement management systems — Requirements for measurement processes and measuring equipment.
- ASME B89.1.12 - 2019, Specification for Coordinate Measuring Machines (CMMs).
- NIST Handbook 44, Specifications, Tolerances, and Other Technical Requirements for Weighing and Measuring Devices.


