Can checking and CMM fixtures be used for parts with internal features? This is a question that often arises in the manufacturing industry, especially when dealing with complex parts that have intricate internal geometries. As a leading supplier of Checking And CMM Fixtures, I am frequently asked about the feasibility and effectiveness of using our fixtures for parts with internal features. In this blog post, I will explore this topic in detail, discussing the challenges, solutions, and benefits of using checking and CMM fixtures for such parts.
Challenges of Measuring Parts with Internal Features
Measuring parts with internal features presents several challenges that are not typically encountered when measuring external features. One of the primary challenges is access. Internal features are often located deep within the part, making it difficult to reach them with traditional measuring tools. This can lead to inaccurate measurements or even damage to the part if the measuring tool is forced into the internal feature.
Another challenge is the complexity of the internal geometry. Internal features can have irregular shapes, tight tolerances, and multiple surfaces that need to be measured. This requires a high level of precision and accuracy in the measuring process. Additionally, the internal features may be hidden from view, making it difficult to visually inspect them and ensure that the measurements are accurate.
Solutions for Measuring Parts with Internal Features
Despite the challenges, there are several solutions available for measuring parts with internal features using checking and CMM fixtures. One solution is to use specialized measuring tools that are designed to access and measure internal features. These tools can include probes, sensors, and gauges that are specifically designed to fit into the internal feature and provide accurate measurements.
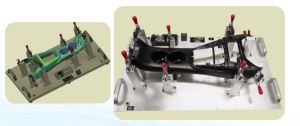
Another solution is to use a combination of checking and CMM fixtures. Checking fixtures can be used to quickly and easily verify the basic dimensions and features of the part, while CMM fixtures can be used to provide more detailed and accurate measurements of the internal features. By using a combination of these fixtures, manufacturers can ensure that the parts meet the required specifications and tolerances.


Benefits of Using Checking and CMM Fixtures for Parts with Internal Features
There are several benefits to using checking and CMM fixtures for parts with internal features. One of the primary benefits is accuracy. Checking and CMM fixtures are designed to provide highly accurate measurements, ensuring that the parts meet the required specifications and tolerances. This can help to reduce the number of defective parts and improve the overall quality of the manufacturing process.
Another benefit is efficiency. Checking fixtures can be used to quickly and easily verify the basic dimensions and features of the part, while CMM fixtures can be used to provide more detailed and accurate measurements of the internal features. By using a combination of these fixtures, manufacturers can save time and reduce the cost of the manufacturing process.
In addition, using checking and CMM fixtures can help to improve the safety of the manufacturing process. By providing accurate measurements, these fixtures can help to identify potential problems and prevent accidents from occurring. This can help to protect the workers and the equipment involved in the manufacturing process.
Examples of Using Checking and CMM Fixtures for Parts with Internal Features
To illustrate the effectiveness of using checking and CMM fixtures for parts with internal features, let's look at a few examples.
Example 1: Automotive Engine Components
Automotive engine components often have complex internal features that need to be measured accurately. For example, the cylinders in an engine block have internal bores that need to be measured to ensure that they are within the required tolerances. By using a combination of checking and CMM fixtures, manufacturers can quickly and easily verify the dimensions of the cylinders and ensure that they meet the required specifications.
Example 2: Aerospace Components
Aerospace components also often have complex internal features that need to be measured accurately. For example, the fuel injectors in an aircraft engine have internal passages that need to be measured to ensure that they are free of defects and within the required tolerances. By using a combination of checking and CMM fixtures, manufacturers can quickly and easily verify the dimensions of the fuel injectors and ensure that they meet the required specifications.
Example 3: Medical Devices
Medical devices often have complex internal features that need to be measured accurately. For example, the catheters used in medical procedures have internal lumens that need to be measured to ensure that they are within the required tolerances. By using a combination of checking and CMM fixtures, manufacturers can quickly and easily verify the dimensions of the catheters and ensure that they meet the required specifications.
Conclusion
In conclusion, checking and CMM fixtures can be effectively used for parts with internal features. Despite the challenges of measuring internal features, there are several solutions available that can help to ensure accurate and efficient measurements. By using a combination of checking and CMM fixtures, manufacturers can improve the quality, efficiency, and safety of the manufacturing process.
If you are interested in learning more about how our Checking Fixture Manufacturer and Checking Fixture And Gage Manufacturer can help you measure parts with internal features, please contact us today. Our team of experts will be happy to discuss your specific requirements and provide you with a customized solution. We also offer Checking Fixture For Automotive Industry to meet the unique needs of the automotive industry.
References
- "Measurement Techniques for Internal Features," Manufacturing Engineering Handbook, 3rd Edition.
- "Advanced Metrology for Complex Parts," Journal of Manufacturing Science and Engineering.
- "Using Checking and CMM Fixtures in the Automotive Industry," Automotive Manufacturing Magazine.


