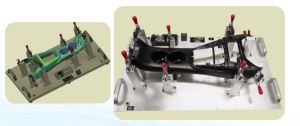
As a supplier of Checking Fixtures, I often get asked about how to measure the accuracy of these essential tools. In this blog post, I'll delve into the various methods and considerations for assessing the accuracy of checking fixtures, which are crucial for ensuring the quality and precision of manufactured parts.


Understanding the Importance of Checking Fixture Accuracy
Checking fixtures play a vital role in the manufacturing process. They are used to verify the dimensions, form, and position of parts, ensuring that they meet the specified design requirements. The accuracy of a checking fixture directly impacts the reliability of the inspection results. If a fixture is inaccurate, it can lead to false acceptance or rejection of parts, which can have significant consequences for production efficiency, product quality, and customer satisfaction.
Key Factors Affecting Checking Fixture Accuracy
Before we discuss the measurement methods, it's important to understand the factors that can affect the accuracy of a checking fixture. These include:
- Material Properties: The materials used in the construction of the fixture, such as metals or plastics, can have different thermal expansion coefficients, which can cause dimensional changes with temperature variations.
- Manufacturing Processes: The precision of the machining, welding, and assembly processes used to fabricate the fixture can introduce errors.
- Wear and Tear: Over time, repeated use of the fixture can cause wear on the contact surfaces, which can affect its accuracy.
- Environmental Conditions: Factors such as humidity, vibration, and dust can also impact the performance and accuracy of the fixture.
Measurement Methods for Checking Fixture Accuracy
1. Coordinate Measuring Machine (CMM)
A Coordinate Measuring Machine is one of the most accurate and widely used methods for measuring the dimensions of a checking fixture. CMMs use a probe to measure the coordinates of points on the surface of the fixture, and the data is then analyzed to determine its dimensional accuracy.
- Advantages:
- High precision: CMMs can measure dimensions with extremely high accuracy, typically in the range of a few micrometers.
- Versatility: They can measure complex geometries and features, including holes, slots, and contours.
- Data analysis: CMMs can generate detailed reports and graphs, which can be used for quality control and process improvement.
- Limitations:
- Cost: CMMs are expensive to purchase and maintain.
- Time-consuming: Measuring a checking fixture with a CMM can be a time-consuming process, especially for large or complex fixtures.
- Environmental requirements: CMMs require a controlled environment to ensure accurate measurements, which can limit their use in some manufacturing settings.
2. Optical Measurement Systems
Optical measurement systems, such as laser scanners and vision systems, are becoming increasingly popular for measuring the accuracy of checking fixtures. These systems use light to capture the surface geometry of the fixture and generate a 3D model.
- Advantages:
- Non-contact measurement: Optical measurement systems do not require physical contact with the fixture, which can reduce the risk of damage and wear.
- High-speed measurement: They can capture a large amount of data in a short period of time, making them suitable for high-volume production environments.
- Easy to use: Optical measurement systems are relatively easy to operate and do not require specialized training.
- Limitations:
- Limited accuracy: Optical measurement systems may have lower accuracy compared to CMMs, especially for measuring small features or tight tolerances.
- Surface finish requirements: The accuracy of optical measurement systems can be affected by the surface finish of the fixture, such as reflectivity or roughness.
- Environmental factors: Optical measurement systems can be sensitive to environmental factors such as ambient light and vibration.
3. Gauge Blocks and Master Parts
Gauge blocks and master parts are simple and cost-effective tools for verifying the accuracy of checking fixtures. Gauge blocks are precision-made blocks of metal or ceramic with known dimensions, while master parts are parts that have been accurately measured and certified to meet specific standards.
- Advantages:
- Low cost: Gauge blocks and master parts are relatively inexpensive compared to other measurement methods.
- Easy to use: They can be used by operators with minimal training.
- Portable: Gauge blocks and master parts are portable and can be used in the field or on the shop floor.
- Limitations:
- Limited accuracy: Gauge blocks and master parts have a limited accuracy range, typically in the range of a few micrometers.
- Limited measurement capabilities: They can only be used to measure specific dimensions or features of the fixture.
- Calibration requirements: Gauge blocks and master parts need to be calibrated regularly to ensure their accuracy.
Considerations for Measuring Checking Fixture Accuracy
When measuring the accuracy of a checking fixture, there are several important considerations to keep in mind:
- Measurement Standards: It's important to use recognized measurement standards, such as ISO or ASME, to ensure the accuracy and consistency of the measurements.
- Calibration: All measurement equipment, including CMMs, optical measurement systems, and gauge blocks, needs to be calibrated regularly to ensure their accuracy.
- Measurement Uncertainty: Every measurement has an associated uncertainty, which needs to be considered when evaluating the accuracy of the fixture. The uncertainty can be affected by factors such as the measurement method, equipment accuracy, and environmental conditions.
- Repeatability and Reproducibility: Repeatability refers to the ability of the measurement method to produce the same results when the same fixture is measured multiple times under the same conditions. Reproducibility refers to the ability of different operators or measurement systems to produce the same results when measuring the same fixture. Both repeatability and reproducibility are important factors in ensuring the reliability of the measurement results.
Conclusion
Measuring the accuracy of a checking fixture is a critical step in ensuring the quality and precision of manufactured parts. By understanding the key factors affecting fixture accuracy and using appropriate measurement methods, manufacturers can ensure that their checking fixtures are performing accurately and reliably. As a Checking Fixture Manufacturer, we are committed to providing high-quality Checking Fixtures that meet the strictest accuracy requirements. Our Checking Fixture For Automotive Industry is designed to provide precise and reliable inspection results, helping our customers to improve their production efficiency and product quality.
If you are interested in learning more about our checking fixtures or have any questions about measuring fixture accuracy, please feel free to contact us. We would be happy to discuss your specific requirements and provide you with a customized solution.
References
- ISO 10360: Geometrical product specifications (GPS) — Acceptance and reverification tests for coordinate measuring machines (CMM)
- ASME Y14.5: Dimensioning and Tolerancing
- "Measurement Uncertainty: A Guide to the Expression of Uncertainty in Measurement" by the International Organization for Standardization (ISO)


